|
Align's T-Rex 600 Nitro
helicopter's cooling fan is upside down. As a result, the RPM
sensor is mounted on the frame. To nicely mount MultiGov's RPM
sensor, follow the instructions below. Note
that this is not the only way to do it; we decided to place the sensor
on the outside of the frame versus the inside for ease of adjustment,
replacement, and maintenance.
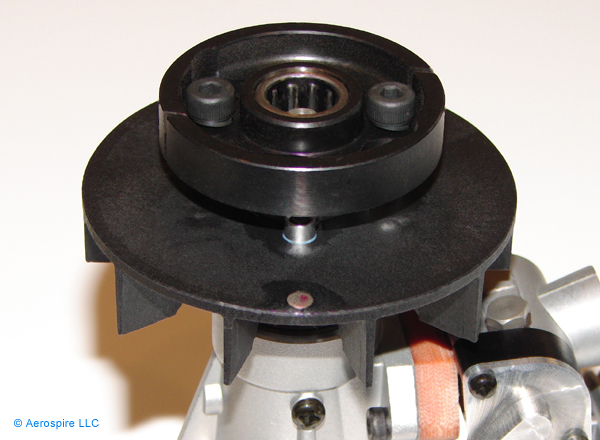
Using 5 or 30 minute epoxy, glue the magnet onto the fan.
Make sure you glue the magnet the correct polarity to match the sensor.
You want the magnet to be fully flush with the fan -- we put some epoxy
in the hole and used a long
nose plier to press the magnet in.
There are two ways we
suggest you mount your sensor. The first way is very simple
without using any brackets but you must be very precise on sensor
placement and bending the sensor. The second way is to modify one
of our included brackets for a more adjustable mount. We leave it
up to you to decide which way you want to go.
|
Method
1:
Simple Bracketless Installation |
Method 2:
Modified Bracket Installation |
|
Step 1:
To mount the sensor outside the frame, enlarge the fan shroud
hole using a Dremel as shown in picture.
Step 2:
After you determine which way to bend the sensor, move fan with
the magnet to see exactly where the sensor needs to be bent so the
magnet runs directly over the sensor. This will typically be
farther out than when you mount the sensor on a bracket.
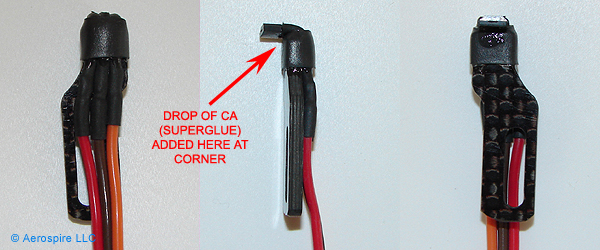
Step 3:
Bend the sensor and apply some CA (superglue) over the heat shrink
tubing so that the sensor wires essentially glue together.
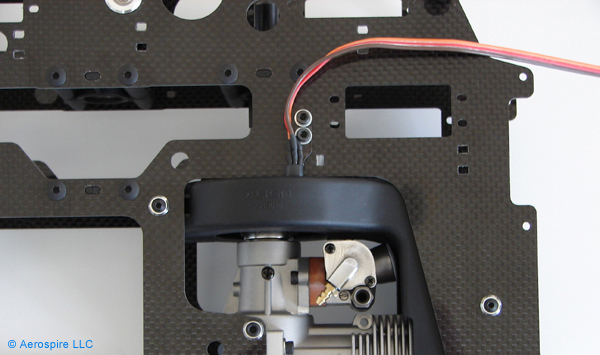
Step 4:
Using the included cable tie, position and secure the sensor
right in between the two holes already on the frame. You must
make sure that the magnet directly runs under the sensor chip, the
governor reads the magnet correctly, and that
there is adequate distance between the sensor and fan so they don't hit
(approximately 1.5-2 mm). For a more secure mount, add a drop
or two of CA between the sensor and the frame after the cable tie has
been tightened.
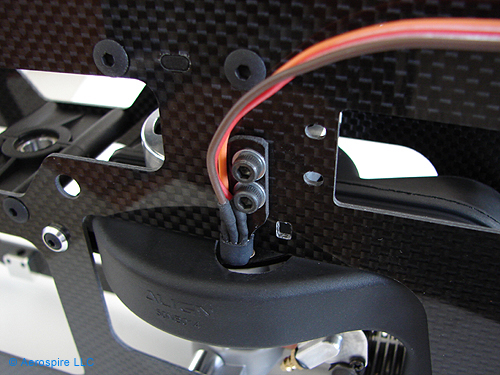
Completed simple sensor
installation.
 |
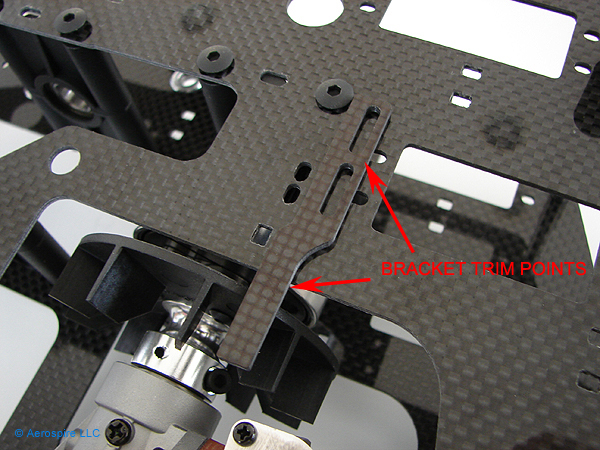
Step 1:
You will be cutting the smallest carbon fiber bracket included with MultiGov
to use as the mount. Place it over the frames to get an idea of
where to trim. The bracket will be cut shorter on
both ends.
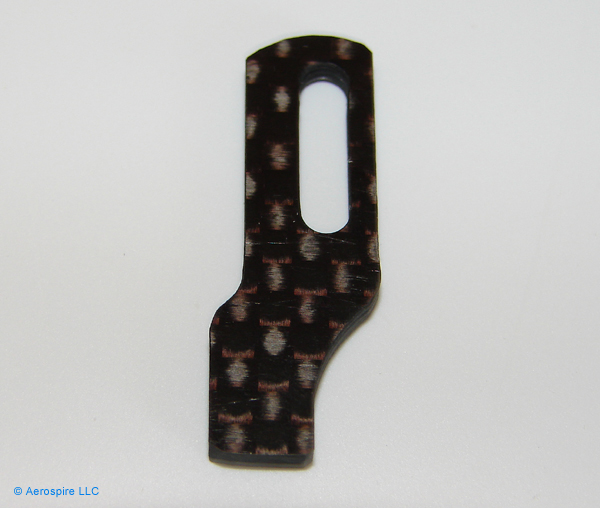
Step 2:
Using a Dremel cutting wheel, trim the small bracket to resemble the
following. Approximately 17 mm was cut off the bottom of the
bracket to make it shorter. The top slot of the bracket was also
trimmed off. You should do a test placement first before actually
cutting as your bracket may differ slightly.
Step 3:
Attach the bent sensor onto the bracket using a small piece of adhesive
heat shrink included with MultiGov. Note that the sensor bend
point is a few millimeters below the chip. Also make sure you bend
it in the right direction to match the magnet polarity. Add a drop
of CA (superglue) at the joint for a more secure mounting. If
there is some heat shrink protruding past the top of the sensor, you can
trim it with an knife/razor blade so that it will not hit the fan later.
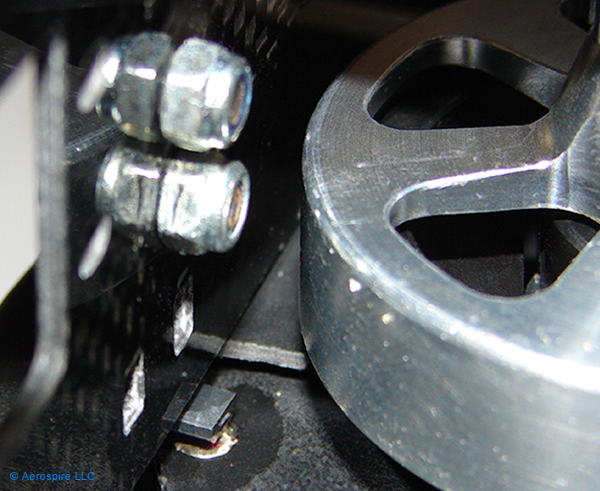
Step 4:
Place the RPM Sensor onto the frame using two bolts+washer+nuts.
We used two 3mm x 8 mm hex bolts with washers and locknuts. The
bolts fit perfectly through the existing two holes on the frame so no
drilling is needed. Trim
the fan shroud so that the sensor has adequate clearance and securely
tighten the bolts once you have a good sensor reading (sensor is approximately 1-2
mm directly above the magnet). Double check everything before you start the
motor for the first time after building the helicopter.
Completed installation.

|
METHOD
1: SIMPLE BRACKETLESS INSTALLATION
Step 1: To mount the sensor outside the frame, enlarge the fan shroud
hole using a Dremel as shown in picture.
Step 2: After you determine which way to bend the sensor, move fan with
the magnet to see exactly where the sensor needs to be bent so the
magnet runs directly over the sensor. This will typically be
farther out than when you mount the sensor on a bracket.
Step 3: Bend the sensor and apply some CA (superglue) over the heat
shrink tubing so that the sensor wires essentially glue together.
Step 4: Using the included cable tie, position and secure the sensor
right in between the two holes already on the frame. You must
make sure that the magnet directly runs under the sensor chip, the
governor reads the magnet correctly, and that
there is adequate distance between the sensor and fan so they don't hit
(approximately 1.5-2 mm). For a more secure mount, add a drop
or two of CA between the sensor and the frame after the cable tie has
been tightened.
Completed simple sensor
installation.
METHOD
2: MODIFIED BRACKET INSTALLATION
Step 1: You will be cutting the smallest carbon fiber bracket included with MultiGov
to use as the mount. Place it over the frames to get an idea of
where to trim. The bracket will be cut shorter on
both ends.
Step 2:
Using a Dremel cutting wheel, trim the small bracket to resemble the
following. Approximately 17 mm was cut off the bottom of the
bracket to make it shorter. The top slot of the bracket was also
trimmed off. You should do a test placement first before actually
cutting as your bracket may differ slightly.
Step 3:
Attach the bent sensor onto the bracket using a small piece of adhesive
heat shrink included with MultiGov. Note that the sensor bend
point is a few millimeters below the chip. Also make sure you bend
it in the right direction to match the magnet polarity. Add a drop
of CA (superglue) at the joint for a more secure mounting. If
there is some heat shrink protruding past the top of the sensor, you can
trim it with an knife/razor blade so that it will not hit the fan later.
Step 4:
Place the RPM Sensor onto the frame using two bolts+washer+nuts.
We used two 3mm x 8 mm hex bolts with washers and locknuts. The
bolts fit perfectly through the existing two holes on the frame so no
drilling is needed. Trim
the fan shroud so that the sensor has adequate clearance and securely
tighten the bolts once you have a good sensor reading (sensor is approximately 1-2
mm directly above the magnet). Double check everything before you start the
motor for the first time after building the helicopter.
Completed installation.
|